
Curbless Shower Drainage on Boise Clay Soil and Slab-on-Grade Homes: 8 Routes That Actually Pencil Out
Bench, Vista, and Southeast Boise ranch homes sit on slab-on-grade foundations over clay loam soils. That changes the curbless-shower conversation from a tile question into a structural one. Here's how the eight viable approaches compare.
If your Boise home was built between roughly 1955 and 1985 — which covers most of the Bench, Vista, large parts of Southeast Boise, and the original Garden City build-out — there's a strong chance your bathroom sits on a slab-on-grade concrete foundation. No crawl space underneath, no floor joists with room to drop a shower pan into. Just a 4-inch concrete slab poured directly on compacted soil, often clay-loam, with the bathroom drains run in conduit cast into the slab itself. When a homeowner asks for a curbless walk-in shower in one of these homes, the conversation isn't about tile or glass — it's about whether and how to cut concrete and route a new drain that handles a half-century of clay settlement without failing.
This is a question we get most often from two homeowner types: aging-in-place planners (who need the zero-threshold entry) and bathroom-remodel buyers who saw a curbless shower at a friend's house and want one of their own. The honest answer is that curbless showers are entirely doable on slab-on-grade — we install them every quarter — but the engineering decisions made at the design phase determine whether the install lasts 20 years or starts leaking at year 5. Below are the eight viable approaches, ranked by saw-cut volume, clay-settlement risk, code passability, and realistic cost in the Boise market.
For the broader curbless-vs-walk-in-vs-enclosed choice, our shower type comparison covers the design-and-cost basics, and our walk-in shower installation guide covers the install sequence for standard floor-framing situations. This page is specifically for the slab-on-grade engineering problem — when the foundation under the bathroom is the constraint.
A standard Boise-era residential slab is 3.5–4 inches of concrete poured over a 4–6 inch compacted gravel base, with #3 or #4 rebar grid (1960s–70s) or welded wire mesh (later 1970s–80s) spaced at 12–18 inches on center. Beneath that gravel is the native soil — for the vast majority of the Treasure Valley, that's clay loam (Bench, Vista, parts of Southeast Boise) or sandy loam (closer to the Boise River corridor in Garden City). A vapor barrier may or may not be present depending on the era and builder.
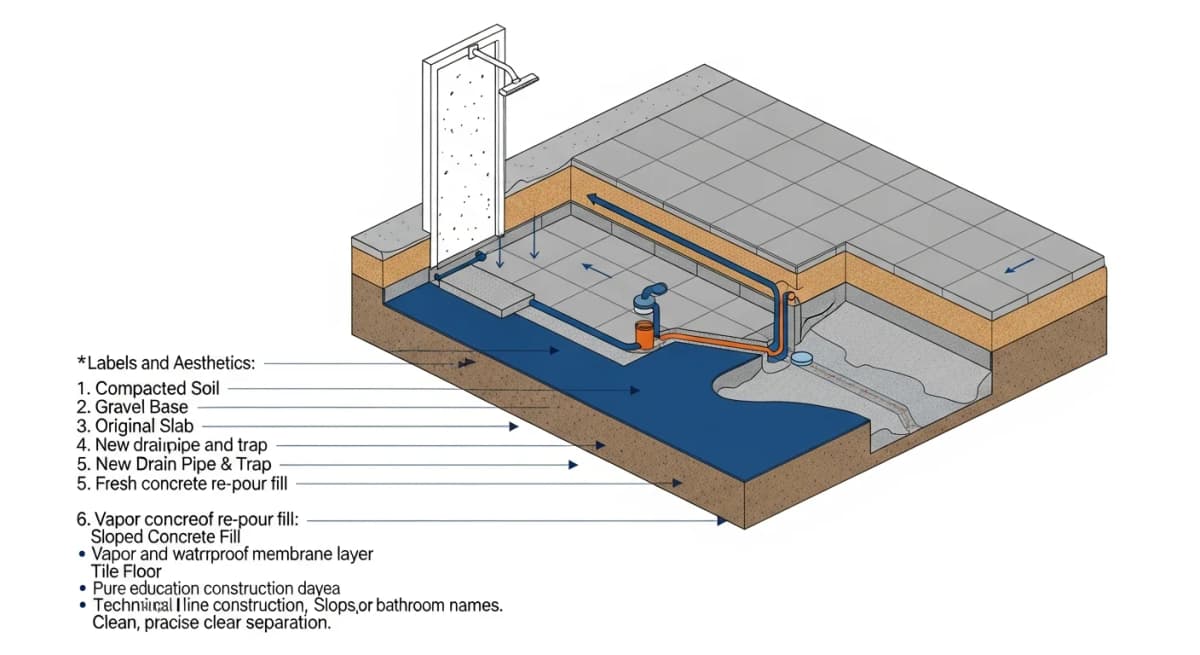
When we saw-cut into a slab for a curbless shower drain, three things matter for cost and structural integrity. First, rebar location — we scan with a rebar locator before cutting, and ideally the cut path stays between rebar runs to avoid severing the structural grid. When rebar must be cut, we re-anchor the concrete on both sides with epoxy dowels. Second, vapor barrier — if one is present, the cut breaches it, and the new drain assembly has to re-establish the moisture seal. Third, soil exposure — once the slab is removed, the bottom of the gravel base or the native soil is exposed, and the new drain trap and pipe routing have to happen before backfill and re-pour.
Cost impact (estimate): the slab-cutting and re-pour portion of a curbless shower drain install runs $1,800–$4,500 depending on the cut length and whether rebar dowel re-anchoring is required. This is on top of the standard curbless shower scope and is not optional — there's no curbless-on-slab install without it.
Homeowners willing to invest in the structural work that makes the curbless install last. There's no shortcut around the slab cut.
A standard non-curbless walk-in with a low curb avoids the slab cut entirely and saves the $1,800–$4,500. That's the real choice point.
The perimeter linear drain runs the full length of the shower's far wall (the wall opposite the entry), and the entire shower floor slopes in one direction toward it. This is the cleanest geometry for a curbless install because there's only one slope direction to manage, and the drain itself sits flush with the wall where it's least visible.
From a slab-cutting perspective, this is also the lowest-impact option. The cut runs parallel to the wall, typically 4–6 inches inboard from the foundation footing, which means it's away from the highest-stress zone of the slab. The cut length is the width of the shower (typically 36–60 inches), and the new drain pipe routes through the cut to tie into the existing main drain — usually a short run if the existing shower drain is already nearby.
The configuration's main constraint is fall: from the entry threshold to the drain, the entire shower floor needs ¼-inch per foot of slope (per IRC 417.5). On a 5-foot deep shower, that's a 1.25-inch drop. The bathroom floor outside the shower has to slope back UP from the threshold, which means careful coordination with the rest of the bathroom layout — particularly if the toilet or vanity is near the threshold.
Shower footprints 5 feet deep or less, where the single slope direction stays within reasonable visual tolerance.
The visual line of the drain along the far wall is a design choice — some homeowners want it, some don't. Aesthetic preference, not a functional constraint.
The threshold linear drain runs along the entry edge of the shower, catching water as it flows from the back wall toward the entry. The shower floor slopes from the far wall down to the threshold, where the drain captures it before it can spill into the bathroom proper.
This is a slightly more complex slab cut than the perimeter option because the drain location is in the middle of the bathroom floor, not against an exterior wall. The cut path crosses the bathroom rather than running along a wall, and the new drain line has to route through a longer span of the slab — typically 3–5 feet further from the existing main drain.
The advantage is the threshold drain is essentially invisible from the bathroom proper because it sits at the floor transition between bathroom tile and shower tile. The clay-soil settlement risk is slightly higher than perimeter (cuts away from foundation footings settle more than those near them), but with proper sub-base compaction during re-pour it's manageable. We use a 95% Proctor compaction spec on the gravel backfill and a 3,500 psi concrete re-pour to minimize differential settlement at the cut joint.
Bathrooms where the design priority is hiding the drain entirely from the bathroom-side view, or where the back wall has plumbing or window constraints that prevent a perimeter drain.
Higher slab-cut cost ($2,400–$4,500 range) and more sensitivity to settlement at the cut. Worth it for the visual clean line at the threshold.
The traditional center point drain — a 4x4 or 6x6 square drain in the middle of the shower floor — requires a two-direction slope. The shower floor pitches from each of the four corners down toward the center. From a slab-cutting perspective, this is the smallest possible cut: just enough to accommodate a 2-inch drain pipe and trap, typically a 12x12 inch core-drill rather than a saw-cut at all.
This is the lowest-cost option in pure slab-cutting terms — $800–$1,500 for the core-drill, drain rough-in, and re-pour — but it's also the least curbless-friendly geometry. With slope in two directions, the bathroom floor adjacent to the shower has to pitch back up in two directions as well, creating a complex slope plane that's harder to design and harder to tile. The visual result is also less "open" because the center drain is the focal point of the shower floor.
We typically recommend center point only when budget is tight and the curbless requirement is functional (aging-in-place) rather than aesthetic. For design-driven curbless installs in Boise's $400k+ home market, perimeter or threshold linear drains are the better spec.
Tight budgets where the curbless function (no threshold) is the priority but the visual is secondary. Aging-in-place primary bathroom remodels under $25k.
Two-direction slope is harder to tile cleanly and creates visible diagonal grout-line patterns that some homeowners find busy.
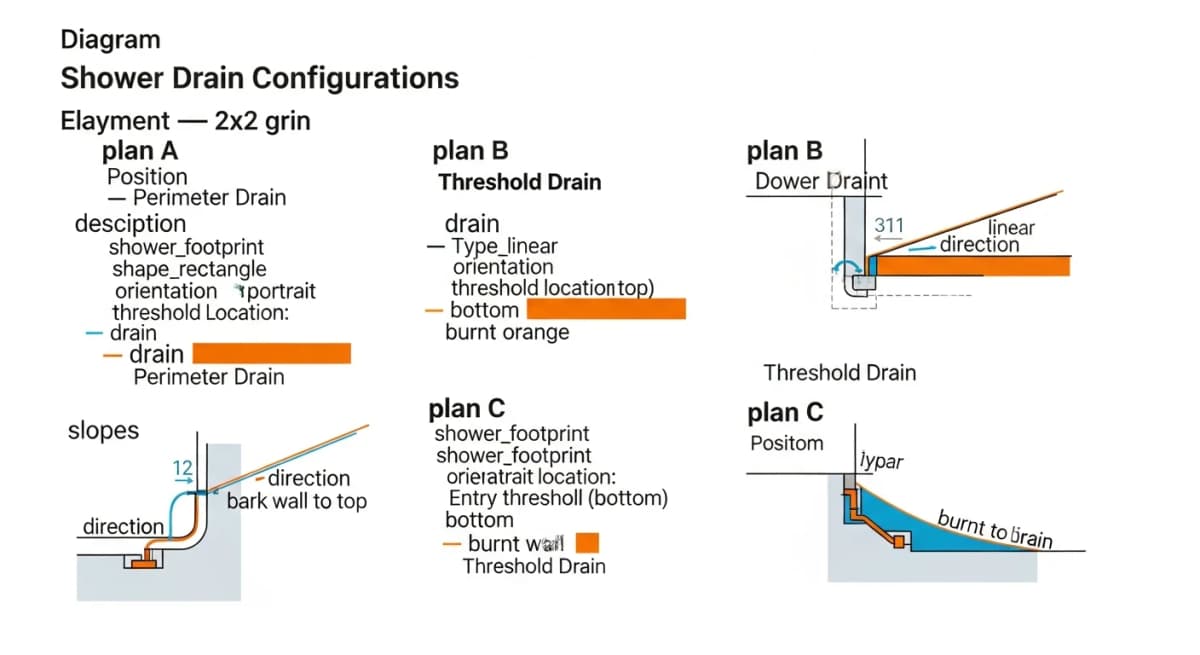
For larger shower footprints (60+ inches deep, typical of master baths in Eagle and Harris Ranch builds), the two-slope hybrid uses two linear drains — one at the perimeter, one at the threshold — with the floor sloping toward each from the center high point. This halves the maximum slope distance and keeps the floor visually flat in the middle.
The slab-cutting cost is the highest of the four configurations because there are two cut paths and two drain rough-ins. The structural impact on the slab is also greater — two parallel cuts essentially create three smaller slab sections that can settle independently over time on clay soils. We mitigate this with epoxy dowel re-anchoring at both cuts and slightly thicker re-pour concrete (typically 4.5" vs the original 4").
This configuration is overkill for any shower under 60 inches deep. For master baths with showers in the 6-foot to 8-foot range — common in custom builds — it's the right call because it keeps the floor slope per linear foot manageable and the visual middle of the shower floor essentially level.
Large master bath showers (60+ inches deep) where single-direction slope would create an uncomfortable amount of pitch from entry to drain.
Highest cost ($3,500–$6,500 just for the dual slab cut and drain install). Only justified on large footprints.
Plan your slab-on-grade curbless shower with engineering, not guesswork
Every curbless install on a Boise slab home starts with a probe-cut at the design phase — a $300 step that eliminates 80% of demo-day surprises. Schedule a no-pressure consultation and we'll assess your foundation, drain depth, and the right configuration for your shower footprint.
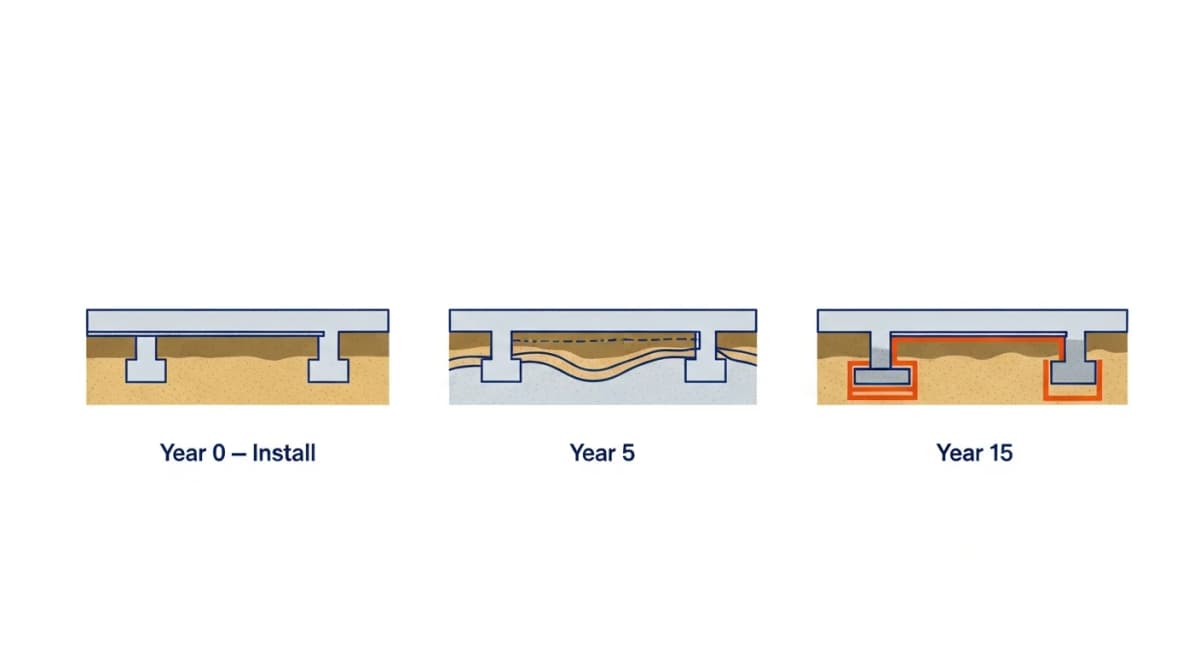
Treasure Valley clay loam expands when wet and contracts when dry. Boise's seasonal moisture cycles — heavy irrigation in summer, dry in winter — cycle the clay through ¼-inch to ½-inch of seasonal heave over a typical slab footprint. Healthy intact slabs handle this without visible issues because the slab acts as a single rigid plate. Slabs with saw-cuts behave differently. Each cut is a stress concentrator, and the cut joint becomes a hinge where settlement differentials concentrate.
Over 10–15 years, an unreinforced saw-cut joint on Treasure Valley clay typically develops a ⅛-inch to ¼-inch step at the cut as the two slab pieces settle slightly differently. In a finished bathroom, that step shows up as cracked grout along the tile lines that crossed the joint, and sometimes as a slight bow in the linear drain itself. Neither is catastrophic, but both require maintenance.
The engineering mitigation is straightforward and worth the cost: epoxy dowel re-anchoring at the cut joint (¾-inch diameter dowels every 12 inches), aggressive sub-base compaction (95% Proctor minimum) during re-pour, and a flexible isolation membrane (Schluter DITRA, USG Durock, or similar) between the new concrete and the tile to absorb minor differential movement. We use all three on every curbless install in Boise. Skipping any of them is the choice that leads to year-7 grout cracks.
Required on every slab-on-grade curbless install in Boise. Not optional.
Adds $400–$900 to the structural-cost portion of the install. Buys 15+ years of joint integrity versus 5–7 without it.
One of the biggest unknowns on a slab-on-grade curbless conversion is the depth and routing of the existing shower drain trap. Pre-1980 Boise homes typically have cast iron or galvanized steel drain assemblies cast into the slab, with the trap sitting 10–14 inches below the finished floor. The drain pipe routes through the slab to the main waste line either toward the back wall (most common) or directly downward into a main trunk line below.
For a new linear drain installation, the existing trap depth determines what's possible. Linear drains need a minimum of 3.5 inches of vertical space below the finished tile surface to fit the drain channel, the trap, and the slope of the drain line toward the existing waste connection. If the existing drain trap is at 10 inches below finished floor, that's plenty. If it's at 6 inches (less common but seen in some 1960s slab pours), the linear drain may need to be raised or the trap re-cut to a deeper position.
Our pre-construction protocol includes a probe-cut at the existing drain location — a 4-inch core drill that lets us camera-inspect the existing trap and pipe routing before committing to a specific drain placement. This is the single biggest source of mid-project scope changes on slab curbless installs, and the probe cut at design phase eliminates 80% of the surprises.
Every slab-on-grade curbless install. The probe-cut at design phase is cheap insurance against demo-day surprises.
Adds $150–$400 to design-phase scope. Saves $1,500–$4,000 in change orders during construction. Math is obvious.
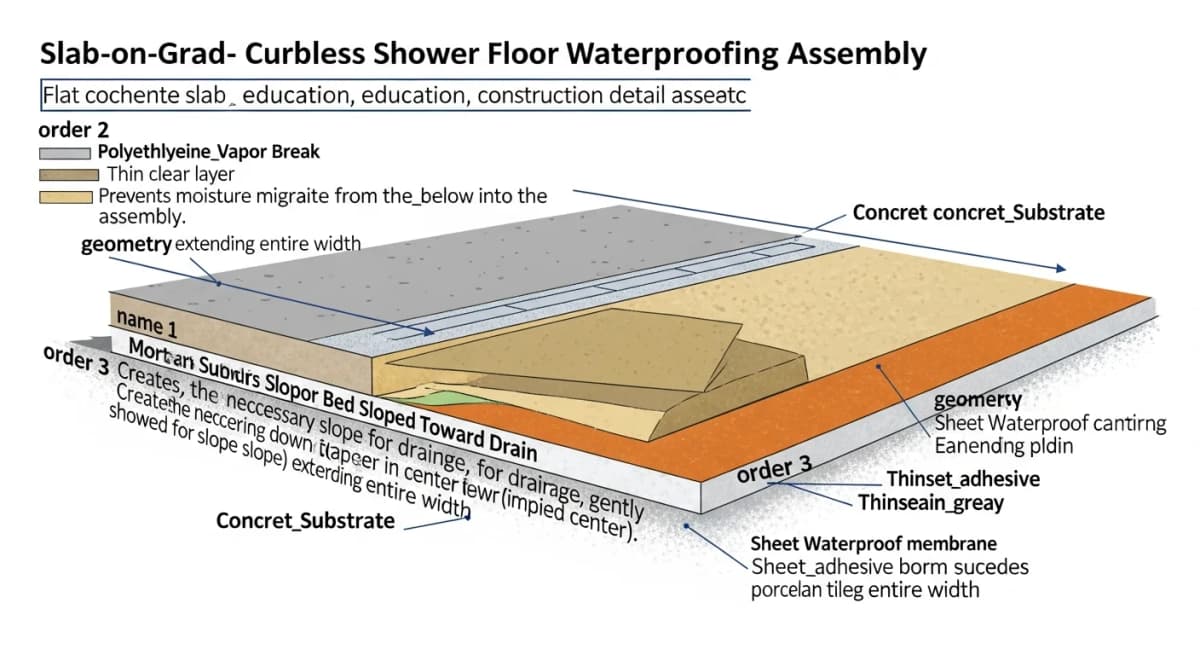
A curbless shower's waterproofing scope extends well beyond the shower footprint because there's no curb to mechanically contain water. The entire bathroom floor is part of the water-management plane, and any tile, grout, or transition outside the shower has to assume occasional water exposure during use.
Our standard waterproofing assembly for slab-on-grade curbless installs uses a sheet membrane system — typically Schluter KERDI or USG Durock Shower System — installed in a continuous layer that extends from the back wall of the shower, across the entire shower floor, over the threshold, and at minimum 3 feet into the bathroom proper. The membrane is bonded to the concrete substrate with unmodified thinset, lapped at seams with manufacturer-specified overlap, and sealed at all penetrations (drain, valve, niche) with prefabricated corners and gaskets.
The clay-soil expansion factor compounds the waterproofing demand. Concrete-substrate movement at the saw-cut joints can crack rigid waterproofing systems (older hot-mop tar systems are the worst for this). Sheet membranes flex with minor concrete movement and survive far better. We don't use rigid waterproofing systems on slab-on-grade curbless installs in Boise — the long-term failure rate is too high.
Every slab-on-grade curbless install. Membrane discipline is what makes the system last 20 years instead of 7.
Premium sheet membrane systems add $800–$1,800 to the waterproofing portion of the scope versus hot-mop or fluid-applied alternatives. The premium is justified by the failure-rate difference in seasonal-movement environments.
A curbless shower conversion in Boise triggers both a plumbing permit (for the new drain rough-in) and a building permit (for the slab cut and structural work). The plumbing inspection happens after rough-in and before re-pour — the inspector wants to see the new trap, pipe routing, and tie-in to the existing main before any concrete goes back in. The building inspection happens after the slab is re-poured and the substrate is ready for waterproofing.
Critical detail: Boise PDS inspectors check the slope geometry of the bathroom floor before tile goes on. The IRC requires ¼-inch per foot minimum slope from any point on the shower floor to the drain (IRC 417.5), and inspectors carry a 4-foot level and measure. If the slope is off by more than ⅛-inch over 4 feet, they fail it and the tile setter has to re-mortar the floor before re-inspection. Get this right at rough-in, not at the final inspection.
Permit and inspection costs in Boise PDS for a curbless shower scope typically run $400–$800 combined (plumbing permit + building permit + inspections). This is on top of the kitchen-permit cost if the curbless install is part of a broader bathroom remodel that also triggered a permit. Our project managers handle all permitting and inspection scheduling as part of the standard remodel scope — homeowners don't interact with Boise PDS directly.
Every Boise curbless install — the permits are non-negotiable and the inspections protect the homeowner against substandard work.
Inspection sequencing adds 3–5 business days to the schedule between rough-in and re-pour. We build this into the timeline.
Iron Crest's standard approach to slab-on-grade curbless showers in Boise starts with the probe-cut at the design phase. Before we quote the structural portion of the work, we core-drill at the existing drain location and camera-inspect the trap depth and pipe routing. That single design-phase step eliminates roughly 80% of the mid-project surprises on slab installs. From there, the drain configuration (perimeter, threshold, center, or hybrid) gets chosen based on the shower footprint, the existing drain location, and the homeowner's design preference — not on what's easiest to install. We use epoxy dowel re-anchoring at every saw-cut joint, 95% Proctor compaction on the sub-base, Schluter KERDI sheet membrane for waterproofing, and isolation membrane between the new concrete and the tile.
That spec is more expensive than the minimum code-compliant version. It's also why our slab-on-grade curbless installs in 1960s and 1970s Bench and Vista ranch homes are running 15+ years without joint cracks or membrane failures. For the broader context on this work — design, materials, project sequence — see how we run tub-to-shower conversions in Boise and our accessible walk-in shower service page. The slab decision is one of several that we handle during a curbless project; this article covers the foundation-engineering piece in depth.
How can I tell if my Boise home is slab-on-grade or has a crawl space?
Three quick checks. First, walk the perimeter of the house and look for crawl-space access vents — small rectangular vents (typically 8x16 inches) along the foundation at ground level indicate a crawl space. No vents typically indicates slab-on-grade. Second, check for an exterior crawl-space access door or hatch — usually a 24x36 inch hatch in the side or back of the foundation. Third, walk the floor: slab-on-grade has noticeably colder feet in winter than a crawl-space floor (because the slab has no air gap insulation underneath), and you can sometimes hear a slight 'thunk' on slab versus the hollow sound of a wood-framed floor over a crawl. If you're still unsure, our pre-construction walkthrough confirms it definitively within 5 minutes — we look at the foundation type as a baseline diagnostic on every Boise bathroom-remodel consultation.
Can I install a curbless shower without cutting the slab?
Sometimes, but with significant compromises. The two no-slab-cut options are: (1) building up the entire bathroom floor by 3–4 inches with a new sub-floor on top of the existing slab, which creates a step at every doorway out of the bathroom and requires re-trimming and door modifications; or (2) keeping the existing drain location and using a very small slope from the entry threshold to the existing drain, which only works if the existing drain is already in a usable position and the shower footprint is small (under 30 square feet). In our experience, both compromise options end up costing nearly as much as the slab-cut version and produce worse results — the slab cut is usually the right answer if the homeowner is committed to curbless. The honest middle option is a walk-in shower with a low curb (2 inches), which retains most of the visual openness of a curbless and avoids the slab work entirely.
What's the expected lifespan of a properly installed curbless shower on Boise clay soil?
With the engineering protocol we use — epoxy dowel re-anchoring at saw-cut joints, 95% Proctor sub-base compaction, sheet membrane waterproofing with isolation membrane under tile — we expect 20+ year service life on the structural portion of the install. Tile and grout are separate consumables that need maintenance and occasional regrouting on a 10–15 year cycle regardless of substrate. Without the proper engineering protocol — for example, a cheap install that skips the dowel re-anchoring — the structural integrity typically starts showing at year 5–7 with grout cracks along the saw-cut joint line and occasional drain misalignment as the slab pieces settle differently. The cost difference between the two approaches is roughly $1,500–$2,500 on a typical curbless install; the lifespan difference is 8–10 years. That math has informed every install spec we run.
Is curbless shower worth the premium for resale in the Treasure Valley?
Yes, in the higher-end market — and increasingly in the mid-market. Treasure Valley Realtors we work with consistently report that curbless showers are a strong selling feature in homes priced above $450,000, particularly in Eagle, Northwest Boise, Harris Ranch, and the foothills. For the under-$400,000 market, curbless adds buyer appeal without commanding a measurable price premium — it's a 'nice to have' rather than a 'will pay more for.' For aging-in-place buyers specifically (Boise has a strong over-55 buyer segment, particularly in Meridian and Star), curbless can be the deciding feature between two otherwise comparable homes. We don't tell homeowners to install curbless purely for resale ROI — it's most justified when the household actually values the function — but the resale data is supportive rather than negative.
Do all Boise tile setters know how to handle the slope plane on a curbless install?
No, and this is the biggest hidden quality risk on the install. The bathroom floor slope on a curbless shower extends well beyond the shower footprint — typically 3 feet into the bathroom proper from the threshold — and that compound slope plane is significantly harder to set tile on than a standard flat bathroom floor with a curbed shower. We've seen otherwise-good local tile setters produce visible slope irregularities on their first few curbless installs because the technique is different. Iron Crest uses tile setters who have specific curbless experience for these projects, and we're explicit with homeowners about why that matters. If you're hiring a contractor for curbless work in Boise, ask specifically how many curbless installs the tile sub has personally completed — the answer should be at least five.
How long does a typical slab-on-grade curbless shower install take from start to finish?
From demolition through final inspection, a standard slab-on-grade curbless install runs 14–21 working days, longer than a comparable curbed-shower install (typically 10–14 days) because of the slab work and inspection sequencing. The major phases: demolition and probe-cut (1–2 days), slab cutting and drain rough-in (2–3 days), plumbing inspection (1 day, sometimes 2 with scheduling), slab re-pour and 7-day cure (the cure time is non-negotiable and is the longest single bottleneck), waterproofing assembly (1–2 days), tile installation (3–5 days depending on tile size and complexity), final fixtures and glass (1–2 days), final inspection. For a full bathroom remodel that includes the curbless shower as part of the scope, add 5–8 days for the rest of the bathroom work, which can often run in parallel with the slab cure. We sequence everything during design so the homeowner knows the timeline before any work starts.
Plan your slab-on-grade curbless shower with engineering, not guesswork
Every curbless install on a Boise slab home starts with a probe-cut at the design phase — a $300 step that eliminates 80% of demo-day surprises. Schedule a no-pressure consultation and we'll assess your foundation, drain depth, and the right configuration for your shower footprint.
These pages go deeper on the topics linked from this article. Read them before your consultation and you'll come in with sharper questions and a clearer scope.
The following government agencies, industry organizations, and official resources provide additional information relevant to your remodeling project.