
Pre-1960 Boise Bathroom Ceiling Heights (7'-7'4"): 6 Design Decisions When You Can't Add Vertical Space
Pre-1960 Boise bathrooms in the North End, Hyde Park, East End, and original Boise Bench often have 7-foot to 7-foot-4 ceilings. Standard remodel design assumes 8-foot ceilings. Six design adjustments that produce a successful remodel within the actual constraint.
Boise's North End, Hyde Park, East End, and original Boise Bench neighborhoods have substantial pre-1960 housing stock. Many of these homes have bathroom ceilings at 7 feet to 7 feet 4 inches — below the 8-foot residential standard that most modern bathroom design assumes. The reasons are historical: early-20th-century residential construction in the Treasure Valley used lower ceilings for thermal efficiency (less air volume to heat), and bathrooms specifically were often built into former closet spaces with even lower ceilings.
Standard residential bathroom design (NKBA guidelines, manufacturer recommendations, contractor habit) assumes 8-foot or taller ceilings. The recommended tile sizes, fixture heights, light fixture placements, and exhaust fan locations all reflect this assumption. Apply them to a 7-foot bathroom and you get visual proportion problems, cramped feel, code-marginal exhaust performance, and lighting that doesn't work.
This article covers six design adjustments specifically for pre-1960 Boise bathrooms with low ceilings. Each addresses a specific dimension of the design where the standard advice produces poor results in this context.
For broader small-bathroom design considerations — layout planning, fixture selection, lighting strategy — see our small bathroom remodel ideas for Boise. This page focuses specifically on the ceiling-height constraint that affects design decisions in pre-1960 Boise homes.
Understanding why ceilings are low in these homes informs the design approach. The constraint is structural — you typically can't add ceiling height without major renovation.
Historical factors:
Heating efficiency: Pre-1960 Boise homes used coal furnaces, then early-generation gas furnaces. Lower ceilings reduced air volume to heat, lowering heating costs. The cost-driven design decision permeated residential construction across the era.
Original bathroom location: Many pre-1940 Boise homes had bathrooms added during 1920s-1950s renovations to previously-unbathroomed homes. The bathroom was often carved out of an existing closet, hallway, or back porch — spaces that frequently had lower ceilings than the main living areas of the home.
Second-floor framing constraints: Two-story pre-1960 Boise homes (common in North End and East End) often have second-floor ceilings dictated by the roof structure. Knee walls, dormers, and sloped ceilings limit usable height in second-floor bathrooms specifically.
Plumbing routing: Original plumbing routes through ceiling spaces sometimes reduced effective ceiling height in bathroom additions. Drop ceilings (dropped 6-12 inches below the structural ceiling to hide plumbing) were common.
What you can and can't change:
Can't usually change: Structural ceiling height in two-story homes. Roof structure constraints. First-floor ceiling height where second-floor framing is above.
Sometimes can change: Dropped ceilings that were added later (the original ceiling above may be 6-12 inches higher). Bathroom additions where the addition itself can be re-roofed (rare but possible for first-floor extensions).
Can change with major scope: First-floor bathrooms in single-story homes can have ceiling raised if structural roof framing permits. This is full-scope renovation territory ($15,000-$40,000 additional cost on top of bathroom remodel scope) and rarely worth it.
For most pre-1960 Boise bathrooms, the ceiling height is fixed. Design within the constraint rather than fighting it.
Understanding the structural reality before assuming ceiling height can be modified.
Limited ability to change the underlying constraint forces design adaptations rather than fundamental changes.
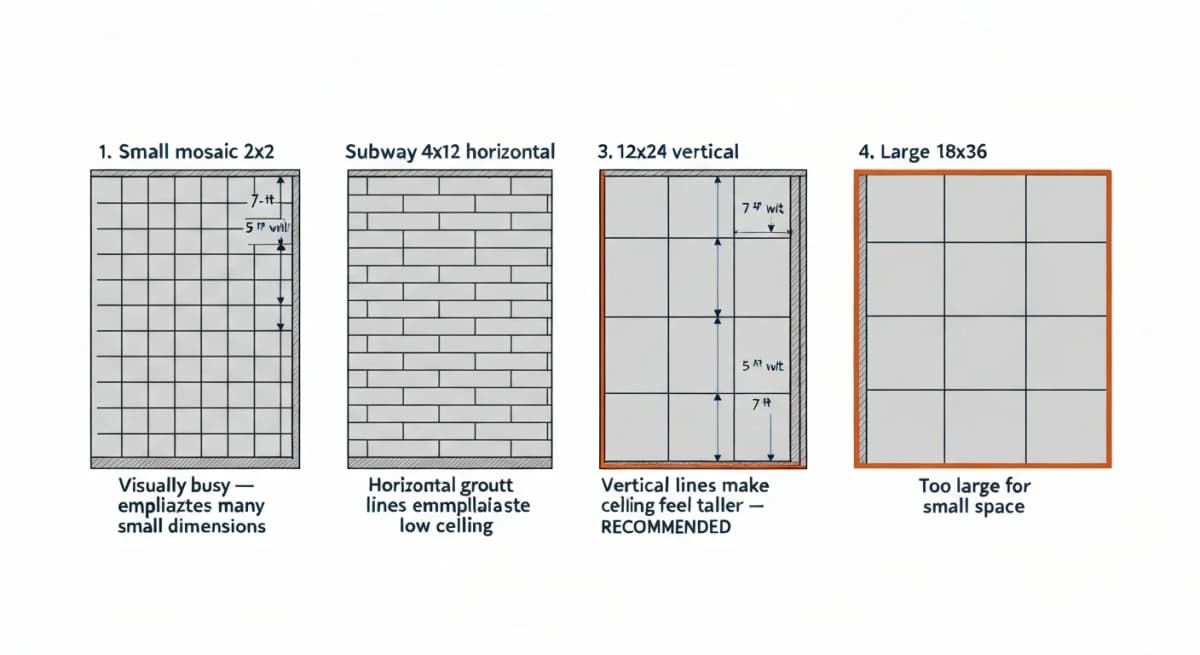
Tile selection has outsized impact on perceived ceiling height. Standard advice (large-format tiles for modern look) often produces poor results in low-ceiling bathrooms. The right tile choice can make a 7-foot ceiling feel like 7-foot-6 or even 8-foot.
Tile size and orientation analysis:
Small mosaic (1x1, 2x2, 3x3): Visually busy. Creates a "many lines" effect that emphasizes the small dimensions of the space. Wrong choice for low-ceiling bathrooms. Acceptable only as accent (single accent wall or band).
Subway tile (3x6, 4x12) in horizontal orientation: The classic "subway" look. Horizontal grout lines emphasize the horizontal dimensions and can make ceilings feel even lower. Wrong choice for low-ceiling bathrooms despite being trendy.
Subway tile (3x6, 4x12) in vertical orientation: Vertical grout lines emphasize vertical dimensions, making the ceiling feel taller. Better choice for low-ceiling bathrooms. Increasingly common in renovation work specifically for this reason.
Medium rectangular (12x24) in vertical orientation: Best choice for most low-ceiling Boise bathrooms. Vertical orientation extends visual lines toward the ceiling. The 12x24 size provides modern proportion without overwhelming the small space.
Large-format (18x36+): Generally too large for low-ceiling bathrooms. The tile size makes the small space feel cramped rather than spacious.
Color considerations:
Light tile colors: Whites, off-whites, light grays. Reflect available light and make the space feel larger. The right baseline for low-ceiling bathrooms.
Avoid dark tile on walls: Dark tiles (charcoal, black, dark blue) absorb light and make small spaces feel smaller. Acceptable only as accent, never as primary wall covering in low-ceiling bathrooms.
Floor tile: Can be darker than wall tile (contrasts well) but consider continuity if the bathroom is very small. Continuous light tile from wall to floor can make small spaces feel substantially larger.
Grout color:
Match grout to tile: Subtle grout color that doesn't contrast with the tile reduces the visual emphasis of grout lines. Makes the wall feel more continuous and the space feel larger.
High-contrast grout: Black grout with white tile is dramatic but emphasizes every grout line. Wrong choice for low-ceiling bathrooms where the goal is to minimize visual interruption.
Pattern considerations:
Vertical herringbone: Wood-look porcelain or stone tiles in herringbone pattern oriented vertically. Sophisticated look that emphasizes vertical dimensions.
Straight vertical stacking: Tiles aligned in straight vertical columns (rather than offset brick pattern). Strongest vertical emphasis.
Offset brick pattern (standard): The default tile pattern. Acceptable but doesn't actively help with proportion. Use vertical orientation to compensate.
Tile selection for any low-ceiling Boise bathroom remodel.
Vertical orientation limits some tile design options. Pattern preferences for horizontal tile must be accommodated through accent rather than primary application.
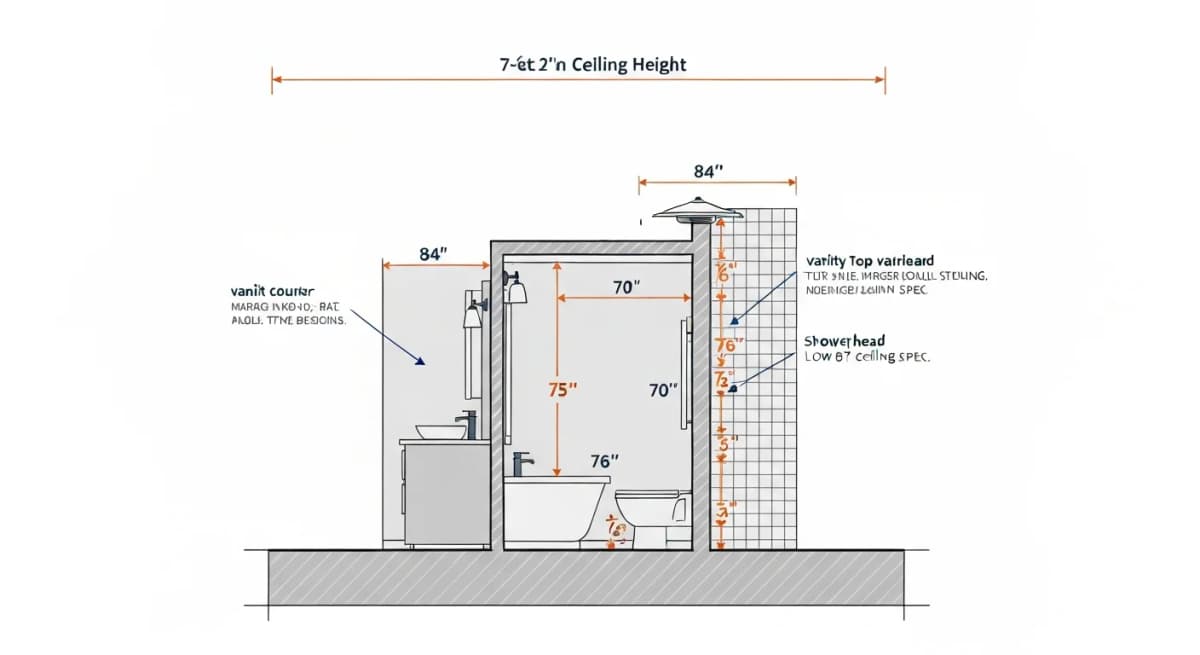
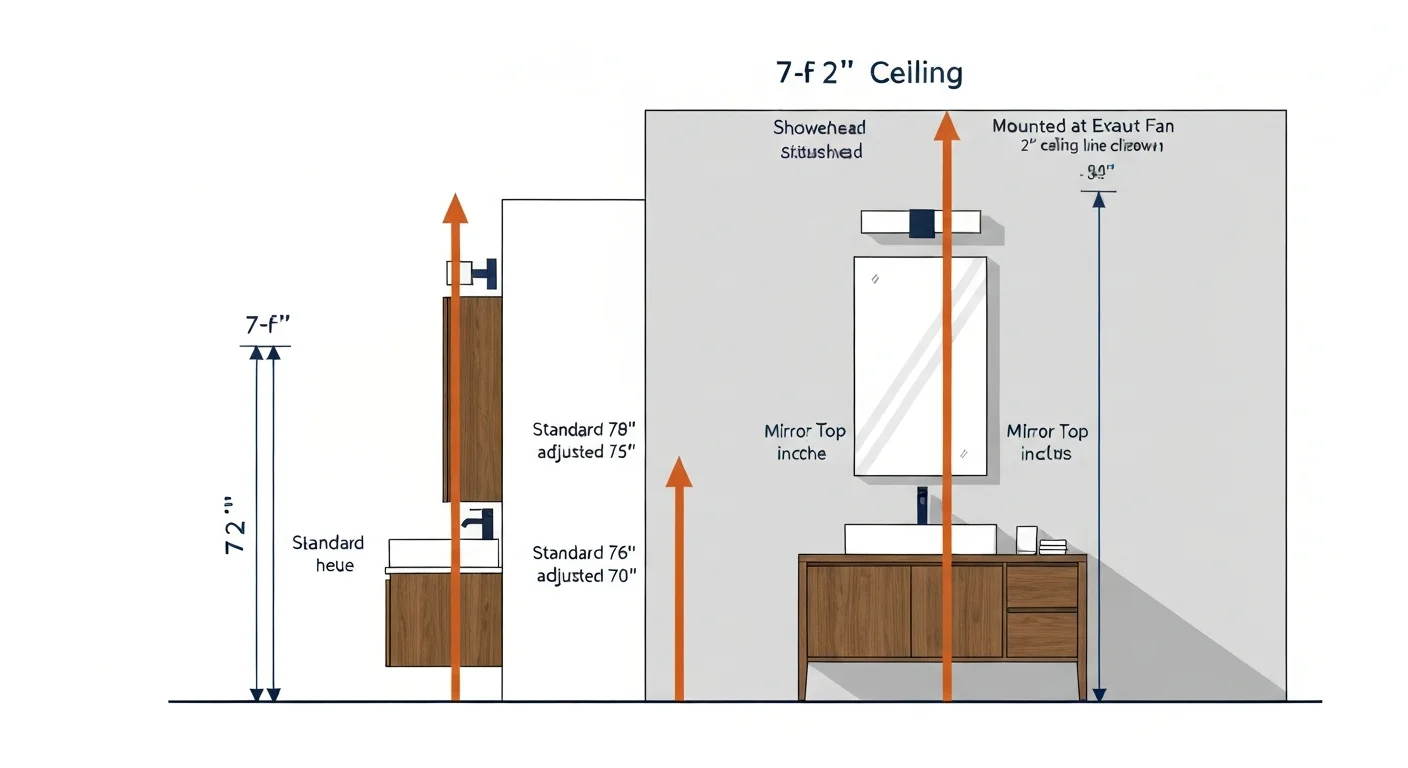
Standard vanity and mirror heights assume 8-foot ceilings. Pre-1960 Boise bathrooms with 7-foot ceilings need adjusted heights to maintain visual proportion and ergonomic function.
Vanity counter height:
Standard residential: 36 inches. The dominant counter height.
Pre-1960 Boise bathroom adjustment: Often 32-34 inches. Lower vanity allows more wall space above for mirror and visual breathing room.
Comfort height (taller users): 36 inches works fine in low-ceiling bathrooms but limits the visual space above. Trade-off decision.
Mirror dimensions:
Standard mirror placement: Bottom at 30 inches (above the vanity counter), top at 70-72 inches. In a low-ceiling bathroom, the top of a standard mirror leaves only 12-14 inches between the mirror and ceiling — visually cramped.
Low-ceiling adjustment: Mirror bottom at 30 inches (same), mirror top at 68-70 inches. The lower top leaves more visual breathing room between mirror and ceiling. Provides better proportions in the constrained space.
Mirror style for low ceilings: Frameless or thin-frame mirrors visually less heavy than ornate framed mirrors. The visual "weight" of the mirror affects perceived ceiling height.
Vanity light placement:
Standard placement: Light fixture mounted 78 inches above the floor (typical for 8-foot ceilings).
Low-ceiling adjustment: Light fixture mounted at 72-75 inches. Lower than standard but still adequate for lighting function. The lower position works better proportionally in the space.
Side sconces vs above-mirror bar: In low-ceiling bathrooms, side sconces (vertical fixtures flanking the mirror) often work better than overhead vanity bars. The sconces use vertical wall space rather than horizontal wall space, fitting the bathroom's proportions better.
For broader vanity-lighting strategy in any bathroom, see our bathroom lighting Kelvin article.
Storage considerations:
Above-mirror cabinet vs separate medicine cabinet: Above-mirror cabinets work in standard-ceiling bathrooms. In low-ceiling bathrooms, an above-mirror cabinet eats critical wall space — usually wrong choice.
Recessed medicine cabinet: Recessed cabinet (built into the wall cavity) maintains visual depth without consuming ceiling-adjacent wall space. The right choice for low-ceiling bathrooms.
Side storage: Tall narrow cabinets beside the vanity, going from floor to near-ceiling, provide significant storage without compressing visual proportion. Use ceiling-following design where the cabinet matches the room's vertical extent.
Pre-1960 Boise bathroom vanity selection and mirror sizing.
Lower mirror top and vanity height limits aesthetic options. Some homeowners prefer to accept standard heights even in low-ceiling bathrooms.
Design a small-ceiling bathroom that feels generous
Pre-1960 Boise bathroom remodels need design specifically calibrated to the ceiling constraint. Schedule a consultation and we'll measure your actual conditions and design within them — not against them.
Shower design in 7-foot ceiling bathrooms requires specific adjustments for showerhead placement, glass enclosure dimensions, and ventilation.
Showerhead height:
Standard residential: 80 inches above the floor (allows clearance for tall users with normal head room).
Low-ceiling adjustment: 74-76 inches. For ceilings at 84 inches (7 feet), 80-inch showerhead leaves only 4 inches of ceiling clearance — visually cramped and physically restricts shower spray spread. 74-76 inches provides adequate clearance for most users while preserving 8-10 inches of visual space above.
User accommodation: For households with users above 6 feet 2 inches, the 74-76 inch showerhead may feel low. Compromise solution: ceiling-mounted rain showerhead (mounted directly to the ceiling) provides high-volume showering from a clearance position that doesn't extend above standard height.
Showerhead style choice:
Standard fixed-height showerhead: Single fixture at the adjusted 74-76 inch height. Works but doesn't accommodate users with very different stature.
Adjustable-height slider bar: Hand-held showerhead on a vertical slider bar (typically 24-36 inches of vertical travel). Each user can adjust to their preferred height. Particularly useful for households with users of different heights.
Ceiling rain showerhead: Mounted directly to the ceiling for overhead rain-style spray. Works well in low-ceiling bathrooms because the ceiling itself becomes the showerhead-supporting surface. Cost: $400-$1,200 for the rain head plus $200-$500 for installation. Beautiful aesthetic, particularly suited to wet-room style designs.
Glass enclosure considerations:
Full-height glass: Glass panels extending to within 6-12 inches of the ceiling. Maximum visual openness. Works in low-ceiling bathrooms because the glass doesn't visually compress the space.
Half-height glass partition (wet-room style): Glass partition extends only 60-72 inches above the floor. Doesn't fully enclose the shower; allows splash spread. Acceptable in larger bathrooms but creates moisture management issues in small ones. Specific to specific designs.
Frameless glass: Visually lighter than framed glass. Right choice for low-ceiling bathrooms where minimizing visual weight matters.
Curbed vs. curbless:
Curbed (traditional): 4-6 inch curb at the shower entry. Standard residential, easy to waterproof.
Curbless: Flush floor from outside to inside the shower. Visually larger feel in small bathrooms. Particularly valuable for low-ceiling spaces because it eliminates one horizontal interruption. Requires linear drain and specific waterproofing scope.
Shower ceiling material:
Tile to ceiling: Continuous tile from the shower walls up to the ceiling. Reduces moisture penetration into the ceiling drywall. Critical in low-ceiling bathrooms where showerhead is close to the ceiling.
Painted ceiling above tile: Standard approach. Acceptable in shower designs where the showerhead is significantly below the ceiling. For low-ceiling designs, tile to ceiling is the better choice.
Pre-1960 Boise bathroom shower installations where ceiling height is the binding constraint.
Lower showerhead height accommodates ceiling but limits the natural-rain-shower feel some users want. Mitigated by ceiling-mounted rain head if budget permits.
Bathroom exhaust ventilation is code-required (IRC R303.3, adopted in Idaho) and particularly important in low-ceiling bathrooms where humidity concentrates in a smaller air volume. Standard ceiling-mounted exhaust fans work less well in 7-foot ceilings than in 8-foot bathrooms.
CFM (cubic feet per minute) requirements:
Code minimum: 50 CFM for bathrooms under 100 sq ft, 1 CFM per sq ft for larger bathrooms. The code minimum is often inadequate for actual moisture management.
Recommended for low-ceiling bathrooms: 80-110 CFM for typical small bathrooms (50-80 sq ft). The higher airflow handles the same humidity load in less time, important when humidity concentrates in lower air volume.
Higher-end specification: 110+ CFM with humidity-sensing automatic control. Activates when humidity rises (during shower) and runs until humidity returns to baseline.
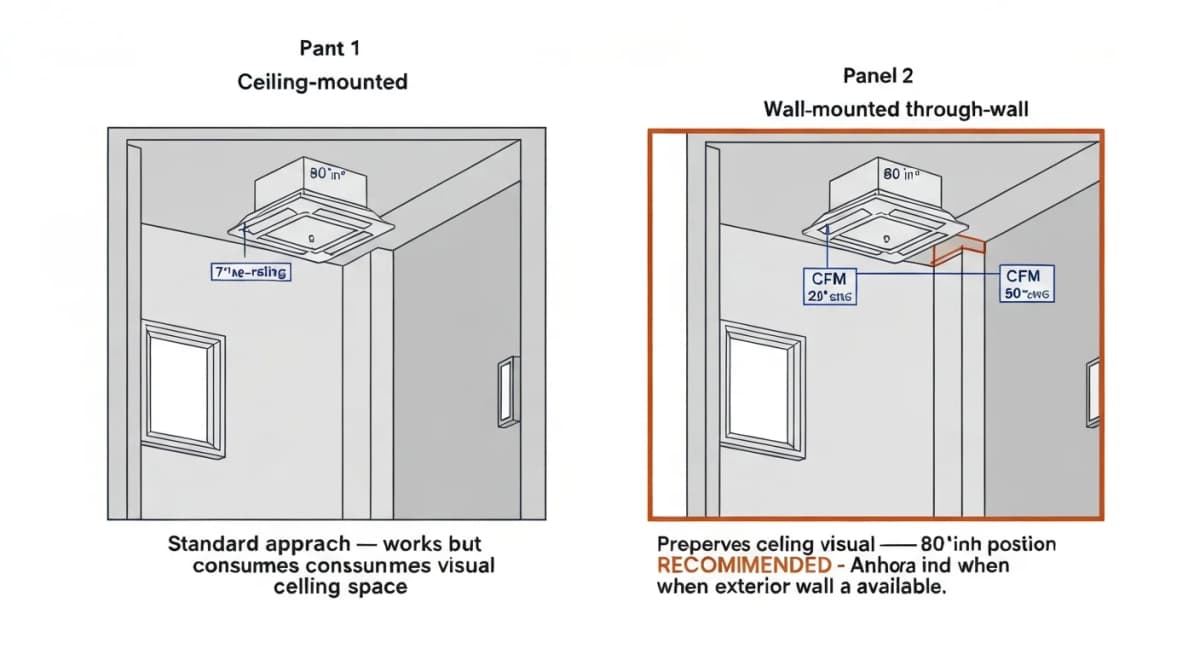
Ceiling-mounted fan placement:
Standard placement: Centered between the shower and toilet, away from wall returns. Works in 8-foot ceilings.
Low-ceiling adjustment: Slightly closer to the shower (within 2-3 feet) to capture moisture before it disperses into the room. The lower ceiling means moisture has less vertical travel distance, so capture point matters more.
Sone rating (noise): 0.3-1.5 sones for quiet operation, 2.0-4.0 sones for typical residential fans. In low-ceiling bathrooms the user is closer to the fan; lower sone rating is more important than in larger bathrooms. Specify 1.5 sones or quieter if budget permits.
Wall-mounted fan alternative:
Through-wall exhaust fans: Mounted high on an exterior wall (typically 80-84 inches above floor in a 7-foot ceiling bathroom). The fan vents directly through the exterior wall rather than through the ceiling. Cost: $150-$400 for the fan plus $200-$500 for wall installation (vs. $200-$500 for ceiling installation).
Benefits of wall-mounted in low-ceiling bathrooms:
Doesn't consume ceiling visual space: Ceiling-mounted fans add visual interruption to the limited ceiling area. Wall-mounted fans integrate into the upper wall.
Better venting path: Through-wall venting often produces shorter duct runs than through-ceiling-to-exterior venting. Shorter ducts = better fan performance.
Easier maintenance: Wall fans are easier to access for cleaning and filter replacement than ceiling fans.
Recommended for pre-1960 Boise bathrooms: wall-mounted exhaust where exterior wall availability permits. Otherwise quiet ceiling-mounted fan with humidity-sensing control.
Pre-1960 Boise bathroom remodels where standard ceiling-mounted fans don't fit well.
Wall-mounted fans aren't always feasible (interior bathrooms with no exterior wall). Ceiling-mounted is the fallback.
Lighting in low-ceiling bathrooms has different priorities than standard-ceiling bathrooms. The reduced ceiling height affects both fixture selection and lighting plan.
Fixture-selection adjustments:
Avoid hanging pendants and chandeliers: Standard pendant lights hang 12-24 inches below the ceiling, leaving inadequate clearance in 7-foot bathrooms. Skip them entirely except in very specific design scenarios.
Avoid flush-mount fixtures with deep profiles: Some flush-mount fixtures extend 6-12 inches below the ceiling. In low-ceiling bathrooms, these become visually obtrusive. Choose slim-profile fixtures (under 4 inches extension below ceiling).
Recessed lighting (cans): Best primary lighting source for low-ceiling bathrooms. Recessed into the ceiling, they don't reduce visual ceiling height. 4-6 inch can fixtures with LED inserts provide adequate output without visual intrusion. Cost: $80-$200 per can installed.
Wall sconces: Side-mounted at the vanity. Use vertical wall space rather than horizontal ceiling space. Work well in low-ceiling bathrooms because they emphasize the vertical dimension.
LED strip lighting (under cabinet, under mirror): Adds task lighting without consuming ceiling space. Particularly effective under-mirror or under-cabinet LED strips.
Layered lighting plan:
Layer 1 (ambient): 2-3 recessed cans providing general illumination. 3000K color temperature with CRI 90+ for accurate skin tone perception.
Layer 2 (vanity): Side sconces or wall-mounted vanity lights at the mirror. Same color temperature and CRI as ambient.
Layer 3 (task/accent): Under-cabinet LEDs, under-mirror LEDs, or accent uplights. Slightly cooler (3500K-4000K) for detailed task work.
Dimmer integration:
All layers dimmable: Allows the user to dial in the right lighting for different uses (bright morning getting-ready, dim relaxing bath). Particularly valuable in small spaces where excessive brightness feels harsh.
Smart switches: Lutron Caseta, Leviton Decora Smart, or similar. Enables programming, scheduling, and integration with broader smart-home systems.
Natural light considerations:
Windows in low-ceiling bathrooms: Often smaller than ideal because the window-to-ceiling clearance is limited. Look for replacing existing windows with taller-but-narrower units if structural framing permits. Larger glass area improves natural light without compromising privacy.
Skylights: Difficult in two-story homes (no roof access). For single-story homes or top-floor bathrooms, a skylight can dramatically improve the space — adds the impression of significant ceiling height by providing a vertical light source. Cost: $1,500-$5,000 for skylight installation.
Glass-block windows: Older Boise homes sometimes have glass-block windows from earlier renovation eras. These provide light but limit ventilation and modern aesthetic. Often replaced during remodel with modern privacy-glass windows.
Lighting design for any low-ceiling Boise bathroom remodel.
Limits fixture-style options. Most pendant and chandelier styles are off the table.
Iron Crest's pre-1960 Boise bathroom remodels start with a ceiling-height measurement and work outward from there. We document the actual ceiling height (it varies even within a single bathroom for pre-1940 homes), assess opportunity to recover dropped ceilings if applicable, and design within the resulting constraint rather than treating it as an afterthought.
Most North End, Hyde Park, and East End Boise bathrooms we remodel come in at 7 feet to 7-foot-4 ceiling height. The design adjustments outlined here are part of our standard process for these projects. Cost premium over standard-ceiling bathroom remodels is modest — typically $1,000-$3,000 for the specific design and fixture adjustments. For broader small-bathroom design, see our small bathroom remodel ideas resource and Boise bathroom remodeling page.
Can I raise my pre-1960 bathroom ceiling during a remodel?
Sometimes, with significant scope. Three scenarios: (1) If the existing ceiling is a dropped ceiling (added later, hiding plumbing or framing), removing the drop ceiling can recover 6-12 inches. Cost: $500-$2,000 in additional demo and finishing scope. (2) If the bathroom is in a single-story area with accessible attic above, vaulting the ceiling up to the roof structure can dramatically increase height. Cost: $5,000-$15,000 in framing and finish work. (3) If the bathroom is on the second floor below the roof, you may be able to vault into the roof structure. Cost: $8,000-$25,000 depending on roof structure complexity. None of these are trivial, and all require structural assessment to determine feasibility. For most pre-1960 Boise bathrooms, working within the existing constraint produces better cost-per-result than attempting to raise the ceiling.
Does ceiling height affect bathroom code requirements?
Yes, but the requirements are generally manageable. IRC R305.1 specifies a minimum ceiling height of 6 feet 8 inches for habitable rooms including bathrooms. Most pre-1960 Boise bathrooms meet this minimum. Specific code considerations: (1) Exhaust fan venting must direct to exterior, not into attic or wall cavity. (2) Shower zones must have specific waterproofing requirements regardless of ceiling height. (3) Egress requirements (window opening for emergency exit) apply if the bathroom is used as a sleeping room — typically not relevant for bathrooms specifically. The 6-foot-8 minimum essentially never binds in pre-1960 Boise bathrooms; the practical constraint is design and ergonomics, not code compliance.
Will my low-ceiling bathroom feel cramped no matter what I do?
Not necessarily. The design strategies in this article significantly improve perceived space, even though they can't change the actual ceiling height. Key contributors to the 'feels less cramped' result: light tile colors throughout (walls and floor), vertical tile orientation, minimal visual interruption (frameless glass, recessed lighting, slim fixtures), maximizing natural light, and avoiding heavy/dark/horizontal design elements. Boise homeowners often comment that their pre-1960 bathrooms feel significantly larger after remodel even though no square footage or ceiling height was added — the design work creates the perceived space increase.
Do these adjustments increase the bathroom remodel cost?
Modestly. The fixture-height adjustments and specific fixture selections (recessed lighting vs. pendants, slim-profile vs. deep-profile fixtures, wall-mounted vs. ceiling-mounted exhaust) generally don't add significant cost — they're substitutions at similar price points. The tile pattern decisions (vertical orientation, specific sizes) are also essentially cost-neutral. The total premium over standard 8-foot-ceiling bathroom design typically runs $1,000-$3,000 — mostly in additional design time and slightly more careful fixture selection. Modest premium for substantial improvement in the final result.
Should I avoid certain bathroom styles in pre-1960 Boise homes?
A few specific styles work poorly in low-ceiling bathrooms. (1) 'Spa-style' with heavy stonework, large-format tile, and dramatic dark colors — overwhelms the small space. (2) 'Traditional' with heavy crown molding, ornate fixtures, and pendant lighting — the visual weight competes with the limited dimensions. (3) 'Industrial' with exposed pipe and heavy metal fixtures — adds visual complexity that doesn't fit the constraint. Styles that work well: modern minimalist, transitional (lighter take on traditional), Scandinavian/Nordic, midcentury modern, farmhouse with light palette. The unifying theme: lighter, simpler, more visually quiet designs work better than heavy and ornate ones.
Design a small-ceiling bathroom that feels generous
Pre-1960 Boise bathroom remodels need design specifically calibrated to the ceiling constraint. Schedule a consultation and we'll measure your actual conditions and design within them — not against them.
These pages go deeper on the topics linked from this article. Read them before your consultation and you'll come in with sharper questions and a clearer scope.
The following government agencies, industry organizations, and official resources provide additional information relevant to your remodeling project.